Tampilkan postingan dengan label New Look 6808. Tampilkan semua postingan

Completed: New Look 6808 Teal Mod Thingy

Squint with me at my new garment!
So this was a big project for me. I challenged myself to design a new style using New Look 6808 (yes, we all know I have a traumatising history with that damned pattern). But I figured if I was going to attempt to design something, I might as well use it as a base since it fits okay after all that work.

My big idea was to have a go at rotating the bust darts down to the bottom of the garment, and using them as release tucks, which I like to call "boobie-tuck-thingies". This is quite an unusual detail in modern fashion I think, but you can see Shanni's 40s inspired boobie-tuck-thingies here, and Gertie's portrait blouse here (her version just uses one tuck each side).

I also changed the neckline to a boat neck and made tulip sleeves (or at least my best attempt at them!)


I got a few tips from Mrs C (who runs Made Marion), such as pressing the darts open instead of to the side (it makes a difference!). While I was at her shop I met a new blogger called Sophie. She makes gorgeous stuff, check it out! She happened to have her new Anna dress with her. It has the same kind of tuck detail at the bust, and they are pressed open too. Neat!

And while I'm talking about other bloggers, I MUST mention, the only reason I made something out of this fabric was a crazy idea we Wellington bloggers had- a bunch of us made garments out of the same fabric so we could look like crazy people in public together:


I don't normally wear teal, but to play matchy-matchy I made an exception. Spot a few other indies in the mix there? (Hawthorne, Pendrell, Chantilly)... See Nikki's or Juliet's posts for more details on the madness that was!


For the tulip sleeve I toiled up 3 different versions before it looked good enough. That's a lot of work ya know! (In defense of my hard work, the first tulip sleeve looked really rubbish, I swear!) Damn, all the other bloggers I've seen making tulip sleeves made it seem so effortless.
There are quite a few tutorials on how to make a tulip sleeve but I think this one is the best. The tip about overlapping the hem really helped me out. Before I did that, the sleeve flared out quite unattractively.

My body is twisted here hence the wrinkles, but it shows off the sheen of the fabric well (it's a silk/cotton blend)
I have a tendency to put too much detail into things. Upon completing it I wondered if bound edges + tulip sleeves+ boobie tucks are all too much in one garment. Now, I just don't want to think about it anymore. lol.

I was pretty over this project by the end of it, just from all the work I'd put into it. And after putting so much effort into it, I can't see it objectively. Does that sound crazy? Would I like it if someone else designed it?? Haha. I'm not sure if I like it yet. Maybe in time I'll see. I think I'm ready to just paint by numbers for a bit. This was a lot of mental exertion!

It's funny, I don't know why I'm driven to make things as challenging as possible for myself! I find it a lot more taxing for me to try and design stuff. It's so much more involved than colouring in between the lines, and it takes so much more time! Plus my inner critic pipes up far too often- hey, maybe it's just another way to grow, huh?

Hey garment, I have no idea if I like you or not!
It was a lot of work binding all those edges. I did it once before on my Taffy blouse, and had the same issue this time. The lightweight fabric tends to get puckered into the binding if you're not careful. I had to be very strict with it and pin, pin, pin. I think it's still a tiny bit puckered in some places despite that...
There are lots of little details on this garment that could be improved but I'm trying not to focus on them :)

Ooh speaking of puckers, my sleeve caps are puckered! Sleeve caps are so annoying, but I couldn't be bothered trying to get them perfect. It'll do. For one, I think there is too much ease built into the cap. And I'm not too sure the fit on the sleeves is that great either. I'm noticing on the back of the shoulder it kind of balloons out a bit. Maybe I need to shave down that side of the sleeve cap? Do sleeves drive anyone else bonkers or is it just me?


But yeah, I'm really glad this project is over and hey! it didn't turn out too badly I reckon. I'll give myself a pat on the back for that. As for the style? I think the release tucks are an unusual feature but I'm not sold on them. What do you think guys?


Completed: New Look 6808- Nightmare Edition

Tada!  A sweet, innocent top!


Just kidding, not innocent at all.  This simple top is what has been killing my excitement for sewing... The pattern is New Look 6808.  If you didn't know by now, it's kinda my nemesis.
This super summery top has taken me so long to make it's now not weather appropriate at all.  Haha.
It looks so easy...  but I'm pretty sure it's cursed.
No, I'm being dramatic.  It's all me- I went to a bad fitting place on this (AGAIN).  You see, I thought I had all the issues ironed out, but then they cropped up again when I started on the final garment!  That cursed back view!
Ugh, I kept trying it on, getting poor husband to take photos of the back, wincing at the result, fiddling with the centre back seam and darts, rinse and repeat, ad infinitum, etc, etc.  It was not fun!

That is one depressing way to sew.  In the end, getting another sewist, Maryanne (she's awesome and an expert- I'm lucky I know her!), to fiddle with the back for me was the answer.  If it wasn't for her, the garment probably would be burned by now.  lol!

Ahh it's like all the trauma is forgotten.  Almost.

This cotton voile seems to be a sticky and grippy fabric, which I think causes wrinkles to form so much more easily when it clings to itself, your skin, and your garments.  Which means you just have to let it go!  However, I am glad the back is looking much more respectable than it did.  Phew!

So back to some positive stuff- I did have fun experimenting with a few things on this top.  I added a self drafted pointed collar, which went quite smoothly in terms of construction- that was nice for a change!  I think I would refine the shape for next time though, making the collar less wide at the shoulders, instead of the same width all the way around.  I used Gertie's tutorial series.

As the width is now, to me it has a slight hint of this guy:
Did I make a pilgrim collar?
Okay, now I've probably ruined the collar forever for you right?  Moving on!

I tried out a sort of neckline split thing at the back, but it droops a bit, I guess due to the weight of the collar.  I don't even know if I did it right- I just stopped the centre back seam early and called it a day.    It's kinda all-around pointless, but I guess it was a good experiment!


For the top of the neckline split, I did my first rouleau loop and my first self covered button (which you totally can't see hidden under the collar!).  The rouleau loop was a bit of a despair moment until I found this nifty method by Steph C which worked out for me!  Hopefully I can incorporate some more rouleau loops into another garment.  They are pretty cool :)

Neckline detail that no-one will notice,  heh!
Hem and side zip- I did them both by hand.  I love how invisible it looks with the busy print!

The sleeves were a bit iffy- they really didn't want to ease in nicely, particularly at the back armscye.  I think the sleeve pattern needs more tweaking (I already had a play with it so it's totally messed up, haha!  But to be fair, it was bad to begin with).  Anyway, I just left the puckers totally intentional gathers in.  By that time I was totally over the garment, and really, I don't think it's noticeable anyway!

Here I tucked it in.  I think I like both ways.  Also: pockets on skirts are amazing.  I must make some pocket-y skirts!


So what did I learn?  Well, putting this garment away for a while after finishing it was good.  I could distance myself from it and now my hate for it has turned to cautious like.

I also learned that I really hate tweaking a garment during its construction.  Even though I made a muslin/toile (oh who am I kidding, I've made half a million by now), I probably could have saved myself a bit of grief by making another.  ALTHOUGH, toiles can be their own form of grief, can't they?  So I'm not sure what I've learned here!

I do know I obsess a bit too much over fit.  I'm still learning to find a balance.  My friend Joy of A Charm of Magpies said to me a while ago "Bodies move, fabric wrinkles".  And I think that's a perfect way of looking at it...
So here goes.  Let's get that body moving!
Look at all my wrinkles!!

Fitting AKA Why I Have No Completed Garment.

So, this is the project that's sucking away my sewing mojo (aka sewjo) at the moment.  New Look 6808, my old nemesis.


Yes, I first starting trying to fit this over a year ago.  I did make a finished garment out of it, but it definitely wasn't fitted to perfection.  lol.  However, it was leagues better than my first toile:

I must never forget this picture.  lol.
There's something you should know about me, and that is that I'm determined to a fault.  This pattern has made the mistake of challenging me, and now I can't rest until I've conquered it.

Of course that's easier said than done, given that my knowledge of fitting is little.  Quite honestly, I've tortured myself with it, and I know that's not good.
I went to a dark despondent place while working on it, but dare I say, it is looking a bit better now.  I think the light may be shining through, after having serious trouble figuring out what to do.
So here's some stuff I did on it.

On the front, I feel I've improved the bust fit a little.  I grabbed a dart of excess fabric from the armhole pointing to the bust, and rotated it into the bust dart.  You can see the excess in this picture (on the right).
So this is my current toile:
I reckon the front ain't bad.  Shorten the bust darts slightly and I'm happy.
I added a centre back seam in an effort to accomodate my curves better.  This is the biggest thing that was driving me crazy- a clumsy, wrinkled back.  I really struggled with this all throughout! 

So many wrinkles.  So many.

At this point, I didn't know what to do.  I let out the centre back seam at the waist a bit which helped, since there were wrinkles pointing to it.


Then I ignored the lower back for a bit and slashed the shoulders to accommodate my shoulder blades, which will also add a shoulder dart like I showed in this post.  It was gratifying to see that tension relax:

I hope you can see the difference in the before and after in the strain on the shoulder blades.  Although I admit the lighting is different.  Oops.

So, progress had been made.  But.... THAT.  BACK!  The fit on the back has tortured me since the start.

First of all, my apparently giant butt seems like it can never have enough fabric.  The garment constantly rides up on my butt!  Yet my back curves in a lot.  Without sufficient darts, I look "back-pregnant" as Andrea would say.  But I just didn't know how to get it to sit nicely. My frustration reached critical levels.

I then thought maybe I'd gone overboard with the shaping so tried reducing the darts slightly, but honestly, I couldn't tell if it made it any better.

Anyway, a few days later, as I'd had time to stew, I got the idea to slit the seams, and I think they have revealed the answer.  So here is the before and after:

Better right?  Please tell me you agree.  By the way, seeing pictures, I'm amazed at the size of my caboose.
 Anway, getting that back transformation was as simple as doing this:


Update for clarity- I don't plan to have a split on the final garment- I will add the size of the split to the centre back in my pattern work :)

So that's the progress.  Oh and I didn't even mention the sleeve malarkey.  I'm over it.

What do you think?  I know it's not perfect, but I've looked at it so long that I can't see it objectively any more.  It's a bit better right?  Would you say... ready for a real garment? 

I wonder how many hours I've spent wandering the house in my toile, poking at its wrinkles in the mirror and hoping for some magical answer to shine down on me.  For now it's just good enough to know that if I bash at it for long enough, something will improve.

But seriously, guys, do you have any advice?  I know I'm being my perfectionist self (umm whoops, didn't I have a goal about that?), but I just gotta beat this thing.
What would you do? :)

I hope you like talking about fitting!

Alright.  I finally did it, I finished New Look 6808.  (Blog post here.)
Time to take another look at the fitting process.

Last time, I was struggling with the back.  I wanted it fitted enough to skim the curves of my back as I think the baggy back wasn't very flattering on me!  I wondered if I had a sway back, but pinning horizontally didn't seem to work out.
In the end I decided to make two extra back darts (rather a huge reduction in the back- each dart was 2.5cm wide).

Sort of like this.

This followed the curve of my back much better.
Was this the "right" way to do it?  I don't know!  Do I have a sway back?  I still don't know, lol!  These answers may come in time....

I also fussed with the front a bit too.  I did another small SBA, and then thought I was really smart by moving the bust dart up, since on my muslin the dart was too low.  But I wasn't smart, lol!  I found out while constructing the final top that when you do a SBA, that naturally moves the bust apex up.... so I had to move the dart back down again. 

Then when trying it on, I found excess fabric at centre front at the waist. 

Spot the wrinkle?
I increased the front vertical darts a bit to take it in.  Again, not sure if that was the right thing to do, lol.  At that point though, I just didn't care.  You're not the boss of me, fabric!
Yeah, then I had wrinkles under the boobs.  But a good pressing sorted them.  Not the boss of me!

Pre-pressing- Not perfect, but better.

Things I have learned through this process:
  • This top wasn't as easy to fit as I expected!  I suspect a princess seamed top like the Pendrell would have been easier to start with!  More seams= more control.
  • I realise that my desire to have things fit my body very snugly may not be quite compatible with this pattern, lol.  I'm not used to wearing wovens- my usual is a body-hugging knit top!  The good news is that I can *just* get this top on and off.  lol!
  • People on the internet are so helpful and I appreciate every word of advice and encouragement.  Thanks guys!

Thoughts for next time:
  • I will have to figure out how to reduce the sleeve cap ease, to eliminate the unwanted gathering effect.
  • I think I may have to redraw the armhole inwards.  See how it seems to be creating a vertical fold near the armholes?  I think there is too much width there.  That's my theory, anyhow.
So that's that.... for now.  I will revisit this top again.  And each time it shall be better than before!  You'd better believe it!  :)

New Look 6808- Finally Finished!!

It's done... it's over.  I finally got a finished garment out of this pattern!  This top has been months in the making.  Months!  It marks my first foray into fitting the top half of my body, and it sure has been challenging.
I never thought it would be so difficult...wow, what a journey. lol.  Lots. Of.  Fitting.
I posted my finished Taffy a while ago, but I actually started that long after I started New Look 6808.  lol.   Let's say it's been an on-again, off-again relationship, full of mental blocks, confusion, and a great deal of searching for help on the internet.
And I did find it!  I'm grateful for the folks at Pattern Review, Alexandra from In-house Patterns, and all the commenters on my blog.  The internet is wonderful!
Okay, enough waffling- pics:


Thanks to the wind for making my hair look fancy here!

It was good I didn't have to worry about ruining the fabric, could you get more basic than plain white?  I know the top is a bit boring, I'm looking forward to doing more interesting things with the pattern next time :)  I also think the fabric was maybe a little too crisp and sturdy.  It really helped bring out every wrinkle...grr!  Now that I'm learning to fit, every wrinkle means so much!

I actually found myself adjusting the fit while sewing this top,  even though I'd already made 3 muslins!  I won't go into that here, maybe I'll make another fitting post soon.  I found the sleeves really horrible to ease in.  I think my fabric was too thick, but also there was just too much ease in the sleeve cap- behold the horror:

Not supposed to be gathered...
I ended up doing some dodgy sewing voodoo to reduce that ease, so the sleeves don't fit into the armhole as drafted.  I eventually got the darn sleeves in without gathers, but the whole armhole/sleeve area definitely needs fixing.  From what I hear, that's a very common complaint about the big pattern companies.

Sans scarf.

The fit is still very far from perfect, but I actually deem this wearable..I think.  It's weird, I never usually wear knit tops so a woven is a different feeling!  I'd like to tweak the fit further before making another version.  I still don't know if I have a sway back, but I ended up making two large back darts to try to get a nice shape in the back. 

Awkward pic, sorry!

It may not be the best garment ever made but when I look at how far it's come, I think I deserve a bit of a celebration! 

Left: very first muslin.

By the way,  I used the same lapped zipper technique as I did for this skirt.  It's really good, and I know someone wanted to know how, so here are the instructions, hope this is sufficient :)

I can't believe I finished this garment!  Onwards and upwards eh?


Fitting, I'll conquer you yet!

Welcome to "Even More Fitting" AKA "This sewing malarkey is trying to crush my iron will"

Seriously, this stupid toile/muslin is getting to be an albatross around my neck!

Okay, so on the last episode of "what does that wrinkle mean?", I was unsuccessfully trying to fix my back with a sway back alteration.  (Okay, enough quotation marks).

Nothing I pinned seemed to look right, and they all pulled up the hem at the back (which I've heard sway back adjustments aren't meant to do).  So, after I made myself a dressform, I finally had the freedom to pin it on the dressform instead of pinning, then trying on, then photographing (tedium).
Surely this would solve all my problems?   If only...

I couldn't see the "horizontal wrinkles" that a sway back was mean to cause.  I umm-ed and ahh-ed, pushed the fabric and prodded and poked my dress form, full of confusion.  Isn't the fabric supposed to tell you what to do?  So... I just grabbed it and put some pins in it where they wanted to go.

Umm... don't know what those wrinkles in front are doing...just... ignore them for now.  They were there before I pinned the back anyway.

Hang on a minute, this seems to have helped!  More confusion as I had pinned out practically the opposite of a swayback- instead of horizontal, I'd pinned vertical...  Hmm.  I started to wonder again if I was able to do fitting.

So, I've been stewing on this for days now.  I will even admit to tossing and turning in my sleep over it.  I'm thinking- maybe I never had a sway back?  Maybe I simply have some kind of small/narrow back, and a big caboose?  And, if I am to take out vertical excess, I can't simply add it to the existing darts right?  (I don't know, there's something in my brain saying you can't make a dart super wide for some reason.  Too much pointness?)  The only thing I can think of is maybe creating two darts?  Hmmmm.  So many questions.  So very many questions.

I've been thinking about maybe getting out some library books on fitting, but I'm a little scared they'll add to the brain stew, and I could end up with a steamed brain!  lol.

I also realised that on the first dress I made, and on a recent bodice toile, I had back issues too!
Please excuse these awful pictures.
Before and After.  Saggy back made me look pregnant.  I took the back waistband in by 6cm I believe
And here, please do excuse the dodgy looking photo.
Then I also realised I took some out of the back of my nightie too.

So basically I seem to have a strange back.  It looks like it might be extra thin back there or something.  I don't even know if that's a thing.  Gosh, my brain is a mess right now!  I've been going over and over this in my head, and looking for answers- it's enough to drive you bonkers!

Any feedback or help is so appreciated!
I'll look back on this one day and laugh right?

More Fitting!

Well, well, fitting, we meet again.  Last time I left you I'd made some progress but I still had a nasty sway back to deal with.  Get ready to see lots of pictures of me in a bed sheet!
The dastardly sway back
Since then, I've added width to the back by slashing and spreading at the hem on each side, because it wasn't going over my bum properly.
Then, it was time to tackle the sway-back.  Again, I was pretty overwhelmed.  But I am still trying!  Here are the results of my sway back experiments.

First I pinned out some above the waist:
Well, disgusting.
As you can see it gave a lovely tented look which made me look pregnant.  Next!
Then I pinned underneath the waistline, but I took too much out:

The hem is too high in the back, but at least I have shape!
Okay, at this point I caved and asked In House Patterns' Alexandra for help- she was so lovely to help me AGAIN!  So I pinned less out ON the waistline:

Alright, not bad, a bit rumply though!
Now I'm not sure this is kosher, but here's my latest experiment, pinning out a bit BELOW that as well!

Is this anything?
As you can see the hem is still higher in the back, but I think that length gets added back in in the sway back adjustment.....
So, I'm still wondering what exactly to do, but I'm slowly getting there... maybe!

Now, to cheer myself up from all this struggle, here is something I didn't mess up!
I've been practicing my crochet skills with scrap yarn- I made these for practice using this free pattern.
Hearts can't have swaybacks, yay!
Well, if anyone has any insights, do let me know!  I appreciate the awesome feedback and support from the web that I've gotten!  You guys are the best :)

Fitting Trials and Tribulations

So... it's time to show something that I've had brewing for some time now.
I've never done any in-depth fitting before, having stuck to skirts so far (and making one dress that didn't fit very well)... so I decided to take on the challenge of making myself a fitted top, darts and all.
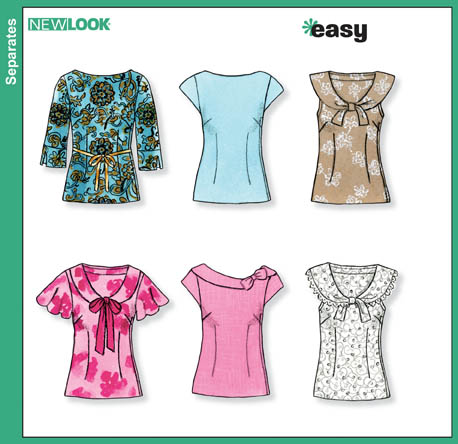
I'm using New Look 6808:
doesn't it just look so innocent and simple?
Well, let me tell you, it sure hasn't been easy getting mine to look like a top- and I'm still not there yet!
Let me show you the horror of the first muslin I made- brace yourself!
Exquisite,  no?
So, bravely taking on the unknown, and with the help of the fine folks at the PatternReview Fitting Woes board , I began my journey...

The first step was taking out all that extra length!  I found out I have a short back-neck to waist, so 4cm came out above the waistline:
Aaah, looks more like a top already!
As you can see, there were still a lot of wrinkles everywhere.  The gurus on the board advised taking some out of the shoulder for a sloping shoulder adjustment.  Also, widening the hips (see those horizontal wrinkles across the front?  not enough width- see?  I'm trying to learn how to read those mystical wrinkles), and a small bust adjustment.  Phew, that's already plenty, but wait, there's more!

The back was really funky- not hanging low enough, so still needed more width over the butt, but also check out that swayback making dirty great pools of fabric back there!  Ick...  However, I wasn't confident with how to tackle it and went on to my second toile:
Don't I look thrilled?
Looks a bit better though, with the small bust adjustment added in.  I definitely got overwhelmed more than a few times during this whole process.  At this point it was doing my head in a bit, so I contacted Alexandra of In-house Patterns, who'd recently done an introduction to fitting, she was so kind and replied with her suggestions- not only that but she made me diagrams showing me how!  Isn't that lovely!  So now she has a dedicated fan of her emerging pattern line.  Check out her bow blouse top, so cute!... you should go buy it ;)

Now it's time for more corrections and possibly/probably a 3rd muslin/toile.  I will update with more on the epic quest for a fitting top!

Note: throughout this process, I've been trying to fit myself all alone except for the internet, no mannequin, having to pin myself in, relying on photos to see my backside... I do not recommend this!  I am scheming to make my own personalised dressform with this method.

It may be a tough journey, but I've already been learning... and I won't quit until it's right!  I will have my fitting top, mark my words!  I'm motivating myself with the thought of the various cute tops I can make with this basic pattern :)

Of course, if anyone has any advice, questions, or suggestions, I'm all ears!
Older Post ►
 

Copyright 2011 making it well is proudly powered by blogger.com